Wednesday 25 November 2009

Temptu Airbrush Make-up


Hi there!
Well! it's been an interesting week. The weather here has become unbelievably hot & humid which means the wet season is on it's way & we will have monsoonal down pours. My heart goes out to everyone that is experiencing heat waves down south.
This last week has been High school formals, graduations, evening facials & body treatments & to top it all off I'm training in internet marketing & advertising.... phew!
One of my make-up girls has agreed to let me post a pic of her into my blog so everyone can see how she looked for her graduation. ( Thanks Gabby!)

Excuse the fake smile... Gabby has a beautiful smile but when you point a camera at her & ask her to smile she pulls this fake one. She wanted to have a natural look & still have the appearance of wearing make-up. My picture isn't the clearest because I carry a 2mp camera around with me just incase someone lets me use a pic of them.

Make-up is applied with an airbrush, which provides a flawless even look over the skin.
A look can be managed by adding more layers of airbrush makeup to create a more dramatic effect.
Airbrush makeup is the longest-lasting makeup type, with the average durability of 16 hours--although it can last up to 20 hours.  It is also sanitary, because the wand never touches the skin.
For this reason, airbrush makeup can be used on multiple people without having to sterilize application instruments.

Temptu's premier S/B Foundation is the highest quality Silicone-based formula on the market.
Although designed to be applied with an airbrush, S/B is blendable makeup that can also be applied by fingertips, brush or sponge.  The natural properties of silicone impart a soft-focus that radiates a healthy and youthful glow on any skin type.

If you have any questions feel free to ask me!
There's also a demo of  Temptu airbrush make-up on Youtube if you'd like to check it out.


Bye for now!

Thursday 19 November 2009

Acrylic Nail In-fill Tutorial

Hi there!
Finally In-fill time.... Yippee!


First I have to tell you about this. They are shimmer additives for acrylic. I am so happy I found them, I thought I had lost them forever. Once again they were in a box of "Where did I put that?".  I bought these when I was in beauty school ( that was 10 years ago!)  Acrylic has change alot in the last 10 years & you had to add your effects into the acrylic powder if you wanted something really cool & different. Now you can buy all sorts of pre-mixed acrylic powders with sparkles, glitter & stuff! But at the time this is what you had to do.
Start from top left.  White Shimmery Rainbowy powder, Dark Pinky Shimmery Powder, Bronze Shimmery Powder, Gold Shimmery Powder, White Rainbowy Glitter Sticks, Peachy Pink Shimmery Powder, Sliver Shimmery Powder, White Rainbowy Glitter. They don't have any cool names like acrylic powders do now just code numbers. These powders aren't acrylic they are additives so when you use them you have to mix them with acrylic powder for them to work.

I have made a custom colour for my In-fills out of White Shimmery Rainbowy, White Rainbowy Glitter Sticks and French white.

Before I get to carried away let's get to the tutorial
This is what I have used.

I'll start from top left, in the little bottle with the white lid I have made a custom colour for my french tips. Next I make little aluminium bowls by moulding the foil over a nail polish bottle lid ( I'll have to show you how I do that one day) to put the custom colour in. The sliver jar is Acrylic liquid ( monomer). My personally marked Dual System Nail Forms ( I have marked each L & R, & which finger they go on.... that's another tutorial to show you).  My acrylic brush, Some paper towel to wipe the brush. Not pictured a nail file & some top coat.

It is very important to prep your hands & nails before you start. Wash your hands thoroughly, Use an antibacterial product on your hands & nails also. Push back & tidy up your cuticles, this is really important to stop lifting so take the time to do this properly.

I have already done this step, I've also filed down the acrylic & used a nail drill/file to take away the bulk from my free edge. You can also see that I've taken off my ring (number 4L) acrylic nail. I seem to always have problems with this acrylic nail (on both hands) with really bad lifting so every now & then I re-do the whole nail.

If you can see in the pic where the acrylic has grown out on my index (number 2L) finger, where the luna (moon at the cuticle) is. It may not look like it's grown that much but as I keep saying I get impatient & do them as soon as I can.


Side view of nails prepped & filled. Next is to use an anti-bacterial wipe (Sani Cleanse) on the nails. Then apply adhesion enhancer to the nails. The acrylic products I use doesn't need primer just adhesion enhancer. (Sorry no pic of this step)

 
Apply the custom french colour into the Dual system nail forms. I have marked the mould on the other side before hand so I know where to put the french smile line. I normally do my french a little less curved but I thought I'd try a deeper smile line this time.


Both sets done with the custom french colour & ready to put the pink acrylic in the nail bed & apply to the nail. I haven't got any pics of me doing this as you have to work really fast & I need an extra set of hands to put the acrylic in the mould, apply to the nail & take a pic all at the same time.... Sorry!

 
Dual System Nail Forms applied to my left hand & waiting for them to set. The black mark at my smile line is my guide for where to put the french acrylic.


The moulds can be applied all the way up to the cuticle to have a seamless finish.


Side view of my left hand. The acrylic takes about 3 minutes to set so while one hand is setting you can do the other hand.


Pop the moulds off, they really do come off very easily. See how shiny they are! There's no need to file & buff the surface of the nail because the mould makes them smooth & glossy.

Side view of my left hand.


File down the length & tidy up the sides. I've done only the left hand for this tutorial but you can see the right hand moulds ready to go in the background, notice the glare off the inside of the moulds? That's why you don't need to file & buff the surface of the nail...... what a shame it would be to ruin the shine by buffing the nail.


Apply a top coat to protect the acrylic & keep them supper shiny. The custom colour doesn't show in the pic that much but it adds a little something.
All done!.... How easy was that?
Now I have to do my right hand & because I have the moulds it is so much easier & my nails come out perfect every time.

I hope you enjoyed reading this tutorial & if you have any questions feel free to ask me.

Bye for now!


Saturday 14 November 2009

Aspirin Beauty Treatments

Hey there!

Times are tough & regular appointments to the Beauty Therapist
is one of the things we tend to stretch out & try doing at home beauty treatments ourselves..
Here are some great tips & money saving tricks you can do at home
 & you will probably have in your cupboards.
 Aspirin
most of us girls will have aspirin because it's great for period pain,
 but there are alot of other uses for this little headache tablet.

First of all you should know a little about aspirin, it's good for headaches & an anti-inflamatory, it's also a beta-hydroxy acid (BHA) which is a very effective form of salicylic acid. BHA & salicylic acids are found in alot of acne treatments & exfoliating skin care products. It has also been known to help relieve calluses, corns, keratosis, pilaris, psoriasis & warts.

Pedicare (pedicure)
Nothing ever beats having a professional pedicare, the beauty therapist seems to be able to make our feet feel like we're walking on clouds. They even get rid of all that yucky build up of dead skin on the soles of our feet. But unfortunately we can't have a pedicare every time we want to change the colour of our polish.  So between your pedicare appointments when your sitting watching a movie, give this a try:

  •  Get 5 or 6 aspirins, Add 1/2 a teaspoon of Lemon juice & 1/2 a teaspoon of water.
  • Squash & grind them together to make a paste,Apply the paste to the calluses on your feet.
  • Wrap your feet in a warm towel & cover them in a plastic bag, Leave for 10 mins.
  • Remove bag & towel, Scrub off dead skin with a foot file or a pumice stone.
  • Be sure to moisturise you feet & your done.
You can also add the aspirin & lemon juice in a foot spa or bowl big enough to put your feet in & soak them for 10 mins, this will make your entire feet feel soft & smooth.

Facial Mask
Regular salon facials are an important part of our skin care routine & are a great way to take some time out for ourselves & every now & then our skin needs a good scrub in between visits to our beauty therapist. The aspirin rejuvenates & exfoliates your skin, it can even helps with breakouts.

  • Get 4 to 6 Aspirin & a few drops of water.
  • Squash & grind them into a paste.
  • Spread paste onto your face & leave for 10 mins, it becomes dry & flaky.
  • Massage gently with warm water in a circular motion, Rinse off.
  • Moisturise & your done.
You can add some honey or natural yogurt to the mix & apply to your face, the honey is very hydrating & the yogurt is refreshing.

Hair Rinse
Summer is coming & this trick will help get rid of the green tinge in blonde hair from chlorinated swimming pools.

  • Dissolve 8 aspirin in a glass of water
  • Rinse hair with the aspirin solution & massage
  • Leave for 10 mins & rinse out
  • Wash hair with shampoo & conditioner
  • Your done!
We've all had those moments when our hair has become flat & uncooperative by build up from our shampoo, conditioner & styling products.

  • Shampoo hair as normal
  • Squash & crush 6 to 8 aspirin into some conditioner.
  • Massage the mixture through your hair & leave for a few minutes.
  • Rinse out & your done.
I hope you give these treatments a try & I'd love to know how they worked out for you.
Bye for now!

Wednesday 11 November 2009

French Polish with Acrylic Paint

Hey There!

If you have read my post on
Tutorial Broken Acrylic Nail

You would know that I wasn't happy with how my EzFlow Silver Screen French smile lines looked & I will fix them the next time I do a re-fill.
 Well I am impatient!
 I ready love the way a new set of acrylic nails look & I don't have to go & pay a nail tech to do my nails for me.
I want to re-fill them but they aren't ready to do just yet & knowing me I would start to re-fill them & go Aww stuff it! take them all off & do a new set.

Anyways...
I resisted the urge to take them all off because I know you will want to see a tutorial on how I re-fill them with Dual System Nail Forms.

So I decided to paint the smile lines in....Oh How Boring a french polish!
Don't worry it bores me more than it does you.
I wanted something a little different So I went searching in my boxes of "Hmmm where did I put that!" stuff when I found 5 tubes of Jo Sonja's iridescent paints in my box of polymer/fimo clay bits & pieces.
Yippee.....Jackpot!


Now you may know my nail polish collection is a little dull so finding these little guys will totally open up my imagination & change how I do nail art. I've seen nail tech's do art with acrylic paint but I've never really tried it myself. I chose the iridescent turquoise .... I have a strange liking to greeny blue coloured nail polish & think it's because people notice & comment on green nail polish (no matter what shade of green it is) before they notice/comment on a pink nail polish.


Jo Sonja's velvet matte finish artist's colours covered my not so perfect smile lines better than I thought they would & I love the effect.


 The pic has made them appear a pinky/red colour, I used a flash so maybe that's why. I didn't want to mess with them in photoshop or I would get carried away & then they wouldn't look right.


A coating of top coat ( which I was really worried about because I didn't know how the top coat would react with the acrylic paint) & they are all done.
They really do look alot more greener than this.

What do you think?
I love it!

Thanks for reading.
Bye for now.

Tuesday 10 November 2009

Tutorial Broken Acrylic Nail


Ok! so in my last post I told you how I'd broken 2 of my Acrylic nails & now I will show you how I fixed them with the Dual system nail forms. This was a little tricky to take photo's of, I'm right handed & it's not easy to do your right hand with your left but these dual system nail forms make it so much easier. Most of the pics are of my left thumb nail, but I pretty much did the same for my right hand nail. Strangely enough my right nail looks better than my left thumb.

Here we go!
This is what my nails looked like.


Left thumb with the corner chipped off.


Right 3rd (bird) fingernail with the corner chipped off.

First of all it is important that I have prepped my hands & nails.
I washed my hands & used Saniprep Cleanse on my nails to make sure there wasn't any bacteria that could get trapped in the acrylic. I didn't need any adhesion enhancer or primer because I'm not putting acrylic on the natural nail.

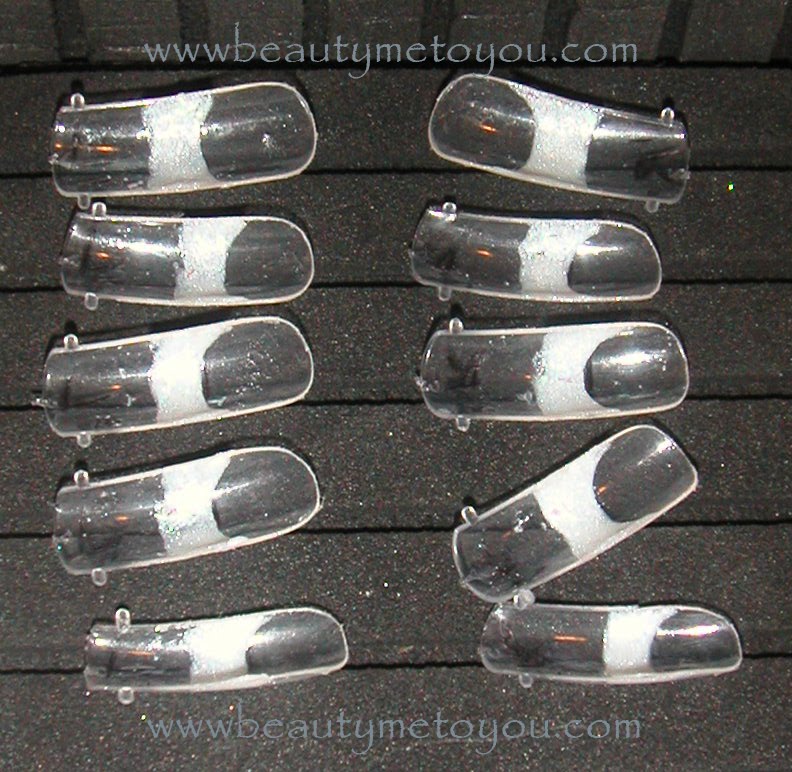
This is what I used.


White Acrylic Powder, EzFlow Sliver Screen Acrylic, Acrylic Liquid, Acrylic Brush, Dual System Nail Forms & Hair Clip (I'll explain the hair clip when I use it) You will also need a nail file & buffer (sorry there not in the pic)


Box of Dual System Nail Forms.
These just look like glue on nail tips huh!... but they aren't.
(When I get to do a full set of nails or have to do a complete repair of a nail I will post a tutorial about it)
These are the moulds, you put acrylic in them & apply to the nail, let it set and then remove them.
So easy!.....
Dual system nails forms are an alternative to using forms to sculpt a nail.
There are alot of nail techs out there that can create gorgeous natural looking nails with sculptured nail forms unfortunately I am not one of them. I would & still do avoid using sculptured nail forms as much as I can, for some reason no matter how much I practice they never turn out the way I want them to & always look really fake to me. So I am so happy that someone came up with Dual system nail forms.


On the left of the pic is the right 3rd fingernail mould, on the right is the left thumb mould (Sorry I only just realised I should have placed them the other way round for the pic to make it a little easier to understand).
I have my own person set marked with which finger they go on & where the free edge line is for a french acrylic nail. Saves me so much time the next time I go to use them.


I have put the mould over my nail & used the hair clip to keep it in place.


The underside view of my thumb nail with the mould held in place with the hair clip.
 I will be working from the underside of the nail.


Apply EzFlow Silver Screen acrylic into the mould where the break is. I have to apply the acrylic in reverse so that the silver glitter can be seen from the
surface of the nail.


 Then I have applied the white french acrylic to underside of the nail, on top the silver acrylic.
.


Wait for the acrylic to set.
This is what it looks like from the suface of the nail, my smile line looks terrible! but I will fix that when I do my next refill. I'll just have to live with it looking a little crooked for now.


The acrylic is still setting, but it's set enough to take the hair clip off.
You can hardly tell that there's a mould over my nail, except for the extra length of the mould extending from the free edge. The little tags on the end of the mould helps you take it off without damaging them.


Take the mould off.


File & shape the nail.


Buff & blend into the rest of the nail
Sorry! I forgot to put a nile file & buffer in the photgraph with the things you will need.


This is how it looks after you have filed & shaped it.
(wow! my skin on my fingers is really dry)


Ta Da!!!
Finsh with a glossy top coat & some cuticle oil & your done.
( I haven't put cuticle oil on in this pic)
You would have to look really, really close to tell that I had broken it.

My 3rd finger nail


After I have put the acrylic in the mould & waiting for it to set.


The acrylic has set & I've taken the mould off ready to file & buff.


My finished nail.
This one looks heaps better.

So there you have it. I hope this tutorial was useful & has given you another option to repairing your nails.

Thanks for reading!

Monday 9 November 2009

Monday 9th


Hey There!

What a day I've had! .....
Mondays are either really busy with clients, as most places are closed or they are for doing stuff that I keep putting off.
So my day...
I was meant to meet up with a local business directory rep about advertising but he didn't turn up & rang me 2 hours after the time we had booked for the appointment to reschedule...
hmmm! not sure if I should do business with this company if they can't keep appointments.

Anyways!
I have been looking at alot of blogs about nail polish Holy Cow! have I lost touch with all the amazing colours out there now.... gorgeous! & thank you so much to all the bloggers that are obsesed with nail polish & sharing it with the world.
It got me motivated to sort out my collection & see how sad it is. Coloured polish isn't very popular with my clients, they tend to go with a french polish on their fingernails so I always have a supply of base coat, a natural pink, white & top coat.
This is my collection


Sad huh?

I spent the afternoon painting full cover tips & adhering them to the neck of the bottles so that clients can see what the colour looks like..... I can't believe how long this took to do.
I can not remember the last time I bought coloured nail polish. Most of these would be between 5 to 10 years old, some I paid alot of money for & some are $2 chemist cheapies. I am so glad I have looked after them because they are still in really good condition. They would be great for pedicares (pedicures) & although I have had them for ages I can't bare to throw them out.

While lifting & going through boxes, I have a habit of packing boxes with stuff that I haven't used for a long time & forgetting about them until I get brain flash & think "Hey I put that somewhere!.... hmmm now where is it!"
This is what happened!
I broke 2 of my acrylic nails. So my next post will be about how I fixed it.


My right third (bird) fingernail.


My left thumb nail.
I have been testing out these new dual system nail forms, OMG I love them! they make doing my right hand so much easier. I haven't quite got them perfected yet but I think that is because I am impatient when I do my own nails.
There was so much more to my day but it was washing ( oh bugger I left washing in the machine) cleaning & all that domestic stuff.... zzzzz boring myself even thinking about it.
Thanks for reading & be sure to check out my next post.
Fixing my broken nails
Check out my website www.beautymetoyou.com
I'd love to know what you think of it.

Bye for now

Sunday 8 November 2009

Intro

OK here goes!
My blog is going to be about all things Beauty Related.
I might even do stuff that has taken my interest at the time to.
I will try & post tutorials & reviews on treatments I do & I can show you without breaking any rules.
Which include
Airbrush Make-up, Acrylic Nail Enhancements, Eyelash Extensions, Eyelash Tinting, Eyelash Perming, Eyebrow Tinting, Manicares, Facials, Pedicares, Spray Tanning.

So for now go and check out my website
I am going to start getting tutorials ready for you all.

Bye for now!