Wednesday 23 December 2009

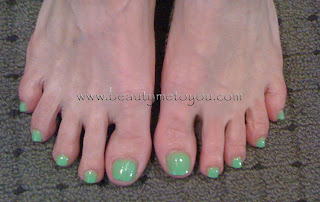
Acrylic toe nails

Hey there!
It's been a couple of weeks since my last post...... sorry! It really does seem like the month of December goes fast, with Christmas shopping and all the other things that go along with it. I really like to make christmas pressies to give to people so I have been learning how to do crochet amigurumi. Amigurumi is the japanese art of crocheting small animals and toys, not those frilly lacey doilies that grannies make. There are heaps and heaps of free patterns on the internet where you can learn how to do it and I have been practising every spare moment I can get so that my friends and family will get really cool cute gifts this year. When I'm finished making all the pressies I will post some photos for you all to see.

Anyways.... Beauty therapy stuff for this post is a ten year old girls fingernails painted with the colours mermaid from artistry and swoosh from nocti.

Her favorite colours are blue and green so we started with a basecoat of white nail polish, then painted the nails blue green alternating and finished them with topcoat to keep them shiny. Tip: Use a white basecoat to make light colours brighter, this trick works really well with neon, fluros and jelly polishes.


Permanent nail polish that grows out. We have used dual system nail forms on the nails so that the coating of coloured acrylic will be even over the entire nail plate and really shiny. They will last about 4 weeks before they need to be refilled, sometimes even longer because every ones toenails grow at different rates. I did have a little bit of trouble (only because I can be a little impatient) when I was applying these, the acrylic took a long time to set and was very flexible. It's a bit of a shame the pic doesn't show how green these nails came out they are very close to neon green and look amazing!

Thank you to my beautiful clients for letting me post photos of them & sharing their treatments with everyone, I really appreciate your kindness.

Merry Christmas to everyone & a fantastic New Year!
Bye for Now!

Tuesday 1 December 2009

The Christian Louboutin Manicure

Hey there!

 I saw this awhile back on a forum, it's called the Louboutin manicure. I know alot of you have seen it before but I still wanted to share this with you. I love the effect so much, that now I paint my nails with one colour & then use another colour underneath the nail. I have been know to have a very traditional white french on the surface of my nails & a bright hot pink on the underneath. For now his is the closest I will get to owning a pair of gorgeous Christian Louboutin Shoes but at least my nails look amazing.


My nails are already painted & I didn't want to take the polish off to show you how I did it, so for the sake of a tutorial I used my practice finger & a tip. Paint your nails with a base coat so that coloured polishes in the future won't stain your nails & a base coat will make coloured polish last longer.


I have used a very glossy black nail polish, this one I bought from a chemist for $2, I had only just noticed that it's Australian made. I wish I could find the supplier because you can almost get away with one coat. I have done two coats.


Paint underneath the nails with a red nail polish, this can be a little messy to do but don't worry the polish comes off your skin if you use a little but of cuticle oil when your nails are dry.  I have done two coats of a nocti colur called ketchup, I bought this one 7 years ago while working in a beauty salon.


China Glaze make a duo of nail polish called the Lubu manicure if you would like to get the authentic colours.  I have read that for a short time, some of Christian Louboutin shoes were available with baby blue soles. For the tradition of "something blue" for bride-to-be, they were only available by special order, & due to trademark issues production was stopped. Wouldn't you love to own a pair of those???
Now I know what colour my next Lubu manicure will be!


Make sure to cap the free edge with the black polish. I have found you get a cleaner finish if you do this after painting the red underneath. Finish your nails with a top coat.
Another tip..... when you have finished & your polish is completely dry, buff your nails very lightly with a sponge buffer or block buffer & paint on another coat of top coat. This gets rid of any imperfections on the surface of the nail & makes them super glossy. You could forget about the second coat of top coat & just leave them matte, That looks pretty cool to.


All done!!!
Ok, so you've had your nails painted for a couple of days now & they are looking a little tired & not as shiny & new as they did when you first painted them, and you really can't be bothered or don't have the time to take the polish off & paint them all over again. Give them a light buff & coat of top coat.... Ta Da! beautiful nails again.
Hope you enjoyed this.

Bye for now!